UPDATE October 2019: I have created a web application that can be used to generate a portrait pattern using a process similar to that described below. Portrait Pumpkin Application
This is the step by step process that I use to create portrait pumpkins of my family each year.
Getting Started
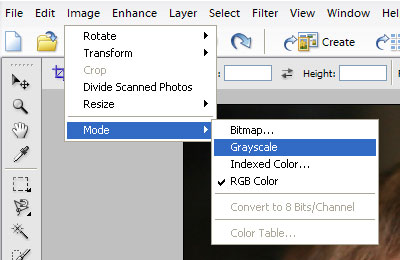
First you need good image editing software. I used Photoshop Elements 3.0 to make this tutorial. Any good image editing software should work, such as the free tool Gimp, though the instructions may be a bit different.
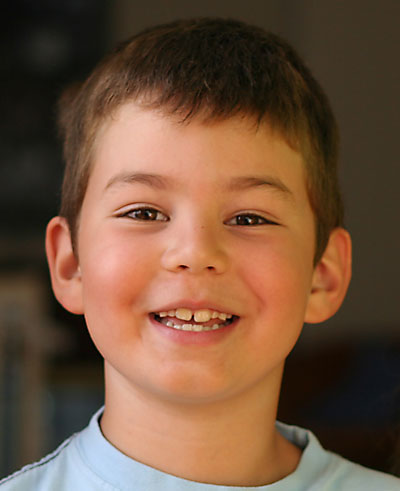
Next, you need a good photo or image of your subject. For the purposes of this tutorial we are making a portrait of a person from a photgraph. The lighting is important as the lightest parts will be carved out of the pumpkin so the dark parts must all connect with the border. It is best is if the primary light source is off to a side and not directly behind the photographer so there are some shadows that connect the dark parts of the face.
This is the original photo I chose for Matthew’s portrait.
Simple Instructions
- Start with a good photo
- Make the photo grayscale
- Add a levels layer
- Add a posterize layer with 3 levels
- Adjust the black, white, and midtone levels layer sliders
- Do any required touchup to the background layer
Detailed Instructions
Step 1. Start with a good photo as described above. I cropped the photo to just include Matthew’s face.
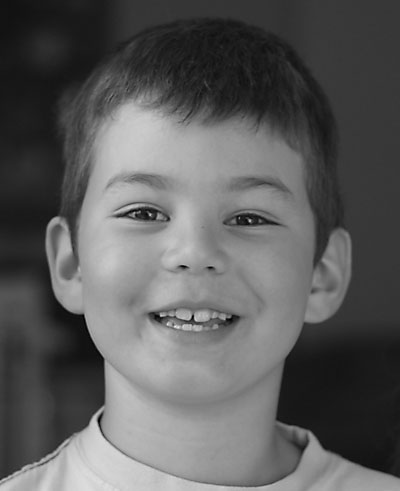
Step 2. Make the photo grayscale
Step 3. Add a levels layer.
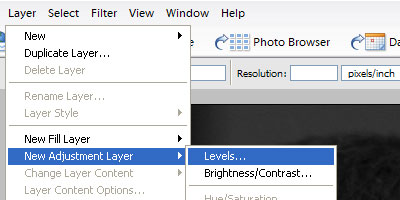
Step 4. Add a posterize layer.
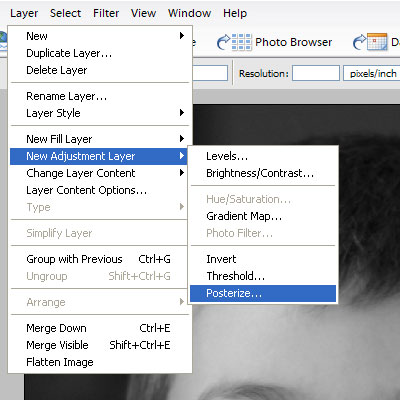
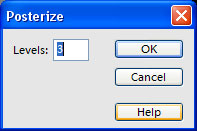
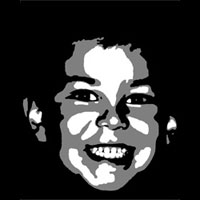
When prompted, select 3 levels. You can carve a pumpkin with three brightness levels by removing just the outer skin over some areas. This area will glow when lit from inside, but is not as bright as where all the flesh is removed. You can see how this works by looking at some of the examples at the end.
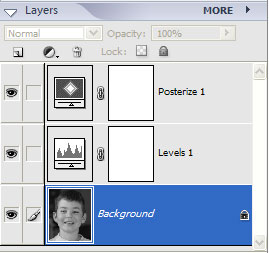
Now you should have three layers including the background.
Step 5. Adjust the levels layer sliders
Open the levels window by double clicking on “Levels 1” in your layer view. There are three sliders under the histogram to adjust the Input Levels. Each one corresponds to each of the three levels of the posterize layer.
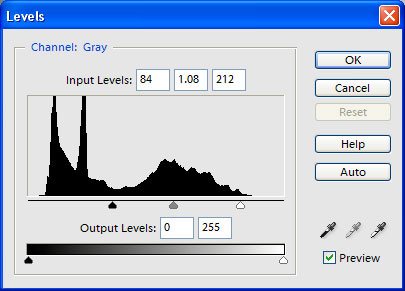
If you want to increase the black area move the left arrow to the right. If you want to increase the white area move the white arrow to the left. Moving the center arrow left and right will change where the grey level is calculated for the posterization. This will take some adjustment.
Remember, a white area cannot surround a dark area since the white area will be removed. You should make sure that all the dark areas are connected to each other and to the edges of the image.
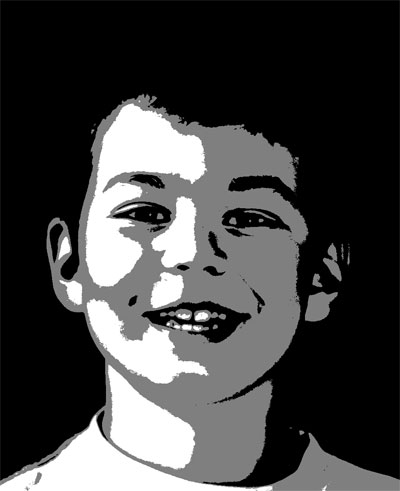
This is what I got with the level values above (84, 1.08, 212)

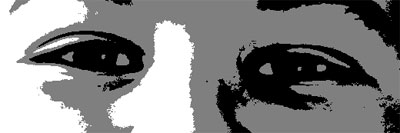
Step 6. Do any required touchup.
Make sure to select the Background layer before making any changes.
In the image above Matthew’s left eye is a bit too dark but adjusting the sliders to brighten it up made the rest of the image too bright. I decided to leave it dark with the levels and brighten it up manually since all the detail is in the original image.
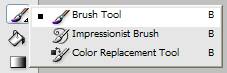
To brighten just a small area of the image select the “Brush Tool” and set the Mode to “Lighten” with an Opacity of 10%. I select the softest brush to blur the changes as much as possible and choose a brush size that is just a bit bigger than needed. You should also set the brush draw colour to white.

I used this around the eyes to bring out some of the highlights by very carefully clicking where the whites of his eyes should be to lighten them just enough to change their colour from black to grey. Just single clicks over the areas I want to lighten until it looks good.
I also lightened up other areas of the face to increase the cut area. I made the brush larger and set the opacity to 3% to cover larger areas very quickly.
Notes:
You can get a similar but reversed result if you set the brush mode to “Darken” and the colour to black. Any areas you draw over will darken.
You may find that it helps to look at the original layer by disabling the levels and posterize layers. This allows you to see what areas will benefit the most.
Blurring the Background layer will also help smooth some of the edges in the final output. This makes the pattern a bit more crisp with clearer lines separating each section. Using the Blur Tool keeps the changes localized to the areas that need it.
Conclusion
Once the pattern is complete you just need to print it out to use as a pattern. You can save yourself some ink if you create a new Levels Layer above the Posterize Layer and drag the black “Output Levels” arrow to the right to lighten the entire image. All you need to do is be able to see the difference between the three levels while transfering the pattern to the pumpkin, it doesn’t have to be solid black. You should also use the lowest quality level of your printer since the details are not important and will be lost during the transfer.
Now you just need to get that onto your pumpkin. The three colours of the pattern represent three states of pumpkin. The black is where you do not cut the pumpkin and leave the skin intact. The grey areas are where you remove the outermost layer of skin, but leave some meat – you can adjust the brightness of those areas by adjusting the thickness of the remaining pumpkin. The white area is where you cut out and remove the pumpkin, like you are used to. While you are carving the pumpkin will look odd until you get it into the correct lighting. The pumpkin should be viewed in the dark with a light source inside. This makes the white areas of the pattern the brightest and the black areas the darkest.
The most common way to transfer the pattern is to tape the pattern to the pumpkin and poke holes along the borders of each coloured area through the paper. You can find other patterns and tools at many stores around halloween and instructions online.
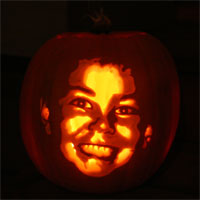
Here is the pattern carved into a pumpkin.

Examples
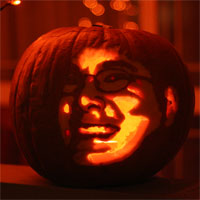
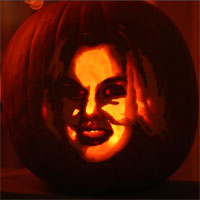
Here are some previous patterns and pumpkins that I have made using this technique.
Thank You
Pingback: The Okuda Family » Blog Archive » Halloween 2006
Just wanted to say thank you for posting this! Halloween will be fun this year! 😀
Fantastic I really want to know how…I paint them for years for Orchards but nothing like this…Thanks for the info
Excellent write up! Thanks so much for taking the time to outline the process. You’ve saved me hours of time figuring all of this out!
– Jack
Very nice instructions! Thanks a bunch! Looking forward to trying it and seeing how my kids turn out. Hopefully not too scary 🙂
Pingback: Photojojo » Photojojo’s Guide to Scary Photo Pumpkins
Thank you for this wonderfully detailed tutorial, you saved me lots of time and frustration, now I can have fun!
Such a great idea! I’ve never seen anything like it… after reading through your tutorial it seems doable — something I’d NEVER have thought by looking at the pictures which are amazing (and look very hard to do!).
Thank you! Have a great Hallowe’en!
Thank you!!! the portraits are fantastic and Im looking forward to trying this myself, yhanks much for the tutorial!!!
Pingback: Portrait Pumpkin Carving App - Notions